Most cast iron skillet pizza articles are one recipe. This one isn’t. The pan changes the math, but so does your oven, and most kitchens can’t hit the 550°F that Kenji’s foolproof method assumes. This guide gives you three methods keyed to the temperature your oven actually reaches, covers Chicago-style deep dish (the cast iron pan is the right tool for it), and explains why cast iron makes a better pizza than aluminum or steel in a home kitchen. The pan is doing physics, not just providing a surface.
Who this is for
You own a cast iron skillet, you want to make pizza in it, and you’ve either read Kenji’s article and been intimidated by the 550°F oven requirement, or you’ve followed a recipe blog and gotten a soggy bottom or a stuck crust. You don’t need a pizza stone, a pizza steel, an outdoor pizza oven, or a $200 dedicated pizza setup. You need to know which method matches your oven.
TL;DR: the three rules for cast iron skillet pizza
- Match your method to your oven’s max temperature. 550°F: bake-only. 500°F: bake-only, slightly longer. 450°F: stove-then-oven (preheat the empty pan on the stovetop, then transfer to oven).
- 2 tablespoons of oil in a 10-inch pan, every time. Less and the crust steams and sticks. More and the bottom fries instead of browns. Bake the empty oiled pan if you can; the oil prepolymerizes onto the seasoning and adds flavor.
- Cold-proofed dough wins. 24 hours in the refrigerator develops flavor and gluten without kneading. Same-day dough makes pizza; cold-proofed dough makes better pizza.
That’s the whole framework. Everything below is the why, the three methods in detail, deep-dish, and what to skip.
Why cast iron is the right pan for pizza (the actual physics)
Three properties of cast iron explain why pan pizza came out of the cast iron tradition and not the aluminum-baking-sheet tradition.
Thermal mass. A 10.25-inch Lodge weighs about 5.5 pounds (per-size weights are in our skillet sizes chart). An aluminum baking sheet of similar surface area weighs maybe 1 pound. When you drop cold dough onto an aluminum pan, the pan temperature crashes; the cast iron pan barely flinches. The pan’s stubbornness about temperature is exactly the property that lets the bottom of the crust hit Maillard-browning range (about 285°F surface temperature) within 60 seconds of going in the oven.
Conduction floor. The contact area between the pan and the heating element (or oven floor) is solid metal, not air. Pizza stones work via conduction too, but a cold stone takes 45 minutes to preheat; a cast iron pan is at oven temperature within 10 minutes because the metal conducts heat through the entire mass instead of relying on slow ceramic absorption.
Emissivity. This is the one nobody talks about. Emissivity is how efficiently a surface radiates heat. Bare cast iron sits at roughly 0.95 emissivity (1.0 is the theoretical maximum, a “black body” radiator); polished aluminum is around 0.07. That means cast iron radiates roughly 13 times more heat upward toward the toppings than an aluminum pan at the same temperature. The cheese melts and the crust edge browns faster, which is why you can finish a cast iron pizza in 12-15 minutes that would take 18-22 in an aluminum pan.
The combination, high thermal mass, direct conduction, and high emissivity, is what makes a $30 Lodge a better pizza tool than any home oven accessory short of a $400 pizza steel.
The dough: a 24-hour cold proof you can make today for tomorrow
You can make pizza with same-day dough and it will be fine. Cold-proofed dough is better, and the active work is identical. The cold proof is just patience.
Ingredients (for one 10-inch or one 12-inch pizza):
- 200 g bread flour (about 1 1/2 cups; King Arthur or any 12%+ protein flour)
- 130 g water (about 1/2 cup plus 1 tablespoon; warm tap water, not hot)
- 4 g salt (3/4 teaspoon)
- 1 g instant yeast (1/4 teaspoon)
- 5 g olive oil (1 teaspoon)
Method:
- Whisk the flour, salt, and yeast in a bowl. Pour in the water and oil. Stir with a wooden spoon or your hand until no dry flour remains. It will look shaggy. That’s correct; don’t knead.
- Cover the bowl with plastic wrap or a lid. Let sit at room temperature for 30 minutes.
- Transfer to the refrigerator for 24 to 72 hours. Longer is better up to 72 hours; the dough develops flavor and the gluten relaxes.
- Two hours before you want to bake, pull the dough out, drop it into the oiled cast iron pan, and let it warm to room temperature while it slowly stretches into the pan’s shape. Don’t push or shape it; gravity does the work.
Same-day shortcut: increase yeast to 1 1/2 teaspoons, let proof at room temperature for 2 hours, then proceed. Acceptable; not as good.
Method 1: Pan pizza, the Kenji-inspired bake-only method (500-550°F)
This is the canonical method Kenji documents in detail on Serious Eats. Use it if your oven hits 500°F or higher.
- Preheat the oven to 550°F (or whatever your maximum is, 500°F is the floor for this method). Move a rack to the lower-middle position so the pan sits about 6 inches from the floor.
- Oil a 10-inch cast iron skillet with 2 tablespoons olive oil. Drop the cold-proofed dough in. Press gently to start the stretch; the dough will resist. Let it warm and relax for 2 hours.
- After 2 hours, press the dough out to the pan’s edges with oiled fingertips. It should reach the rim. If it springs back, wait another 15 minutes and try again.
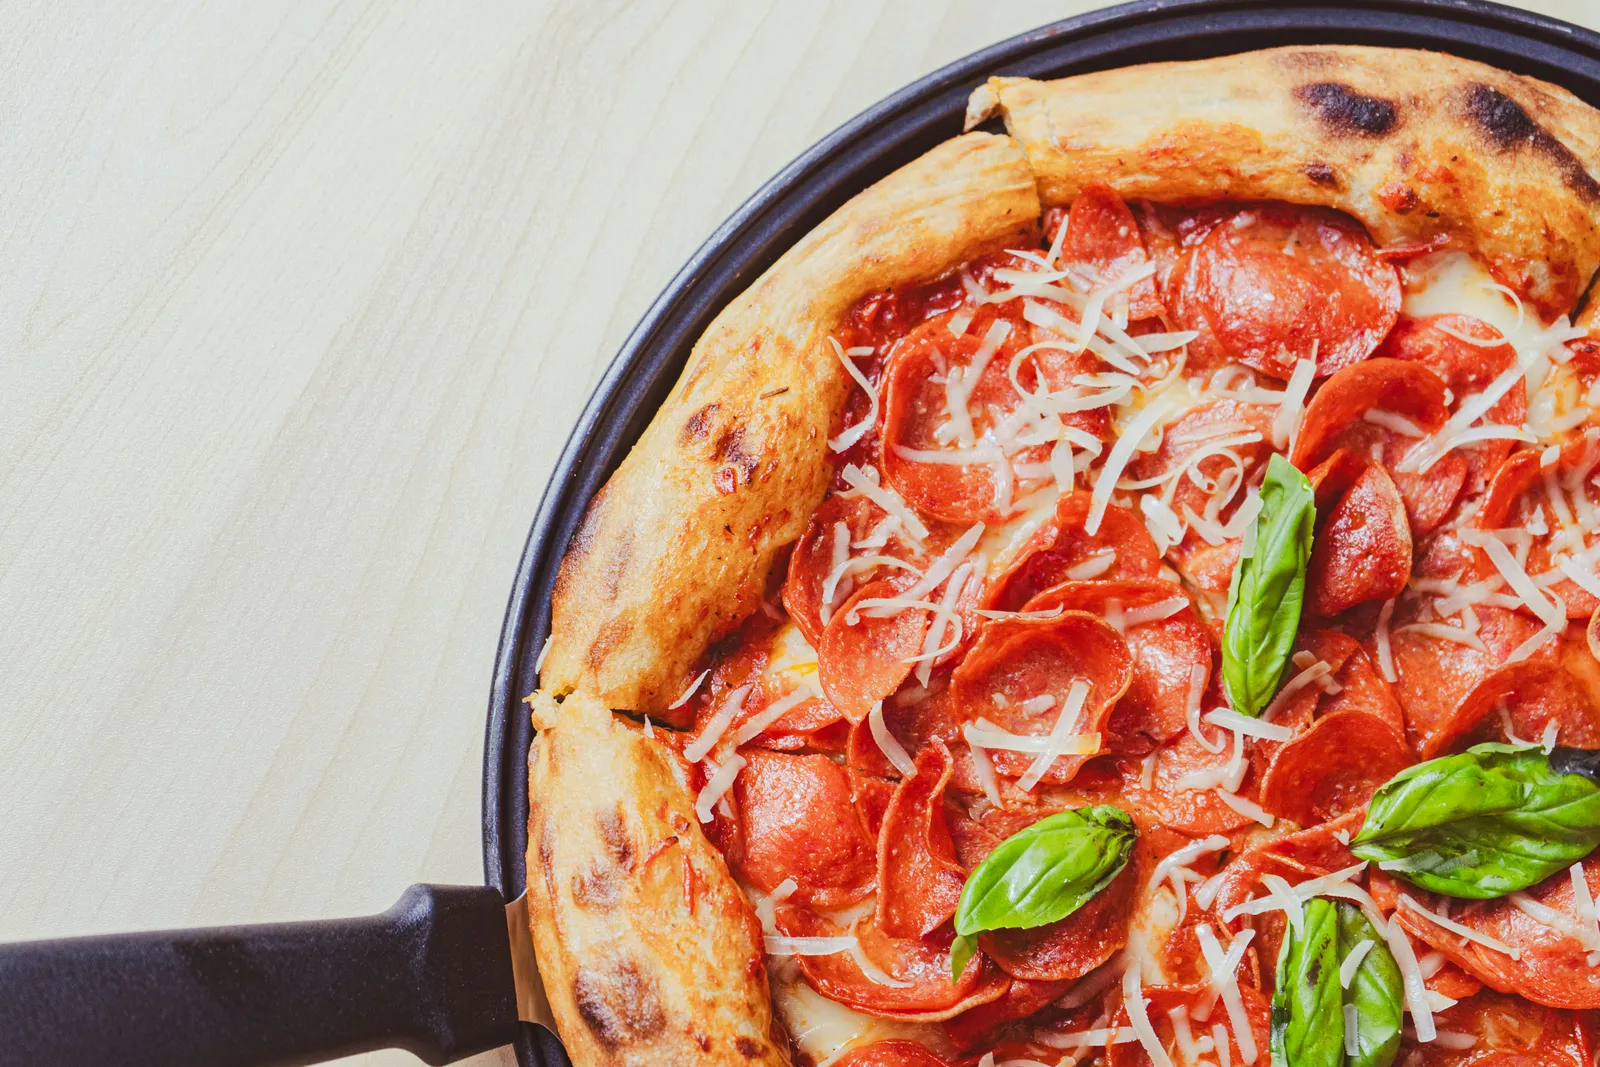
- Top sparingly. 3 to 4 tablespoons of crushed tomato sauce (San Marzano if you can), about 2 ounces of low-moisture mozzarella (half a cup shredded), then whatever toppings (pepperoni, mushrooms, basil after baking, not before).
- Bake 12 to 15 minutes at 550°F (15 to 18 minutes at 500°F). The pizza is done when the cheese in the very center is bubbling and the crust edge has dark golden spots, not pale gold.
- Slide the pizza out of the pan and onto a cutting board within 60 seconds. If you leave it in the hot pan, the bottom keeps cooking and burns. Use a thin metal spatula and lift; the oil should let it release easily.
Method 2: Stove-then-oven (when your oven tops out at 450°F)
Most home ovens cap at 450°F. The stove-then-oven hybrid pushes the pan past your oven’s ceiling by preheating the cast iron directly on a burner before transferring to the oven. This is also the method The Little Epicurean and several other recipe blogs use, and it works.
- Preheat the oven to 450°F. Lower-middle rack.
- Stretch the dough on a piece of parchment (not in the pan; the pan is about to be too hot to handle dough on). Top it: 3 to 4 tablespoons of sauce, 2 ounces of mozzarella, toppings.
- Heat the dry cast iron pan over medium-high heat for 3 to 4 minutes until it’s smoking faintly. A drop of water should evaporate in 1 second.
- Add 2 tablespoons of olive oil to the hot pan, swirl, and immediately transfer the topped dough into the pan (use the parchment as a sling; tear off the excess parchment once the dough is in).
- Slide the pan into the oven and bake 12 to 14 minutes. The hot pan gives you the cast-iron equivalent of a 525°F oven floor for the first 4 minutes of the bake, which is what makes the bottom crisp without needing a 550°F oven.
- Pull at 12 to 14 minutes. Same release rule: out of the pan within 60 seconds.
Method 3: Broil-finish (for thin-crust char)
If you want pizzeria-style char marks on the crust edge and bubbled cheese, finish under the broiler. This adds 60 to 90 seconds of intense top-down heat at the end of the bake.
- Follow Method 1 or 2.
- In the last 90 seconds of the bake, switch the oven to broil on high. Move the pan up to a rack 4 inches below the broiler element if it isn’t there already. Watch through the oven window; do not walk away.
- Pull when the crust edge shows visible char spots and the cheese has dark-brown bubbles. That’s the moment. Another 30 seconds and you have a burned pizza.
This is the technique that comes closest to a wood-fired pizza in a home oven. It also has the highest failure rate; if you’re not watching, you will burn it.
Cast iron deep dish pizza (Chicago-style)
The cast iron pan is the right tool for Chicago-style deep dish. The depth of a Lodge skillet (2 inches at the wall) is exactly the geometry that deep-dish needs, and the thermal mass cooks the bottom crust through without burning the top.
The differences from pan pizza:
- Use double the dough for a 10-inch pan (400g flour version of the recipe above). The dough goes up the walls of the pan, not just across the bottom.
- Cheese goes on the dough first, then sauce on top. This is the deep-dish inversion: cheese underneath the sauce protects the toppings from soggy crust, and the sauce on top reduces in the oven into something closer to a glaze.
- Use 5 to 6 ounces of cheese (a full cup and a half shredded) and 3/4 cup of crushed tomato. Deep dish takes more of everything because the bake is longer.
- Bake at 425°F for 25 to 35 minutes. Lower than pan pizza, longer time. Test by lifting the edge with a fork; the crust at the wall should be dark golden, and the cheese-and-sauce layer should be visibly bubbling all the way to the center.
The Chicago purist will argue you should use a dedicated deep-dish pan with shallower sloped walls. They’re not wrong about the canonical shape, but a 10.25-inch Lodge gets you 90% of the way there for $30.
The sauce, cheese, and topping order (it matters)
Sauce. Crushed San Marzano tomatoes, 1/2 teaspoon salt per cup, that’s the recipe. Don’t cook the sauce; it cooks in the oven. If you cook it on the stove first, it goes bitter.
Cheese. Low-moisture, full-fat mozzarella, hand-shredded from a block. Pre-shredded bag cheese is coated in anti-caking starch (potato starch or cellulose) that prevents clumping in the bag and prevents proper melting in the oven. The cheese ends up greasy and won’t develop the brown spots you want.
Order, pan pizza: dough, sauce, cheese, toppings. Toppings on top because the cheese-melt time matches the topping-cook time.
Order, deep dish: dough, cheese, toppings (raw vegetables, par-cooked meat), sauce on top. The cheese underneath protects everything from the longer bake.
Toppings to add after baking: fresh basil, prosciutto, arugula, anything you want raw at the end. Adding them before baking burns them.
The best cast iron skillet for pizza
A 10.25-inch Lodge Classic Skillet ($30) is the right pan for one pizza for two people. A 12-inch Lodge Classic ($45) is the right pan for one pizza for four. Both have the thermal mass to hold high heat through a pizza bake, both fit a standard home oven, both are dishwasher-proof if you wash them right (see our cast iron cleaning guide for the soap-myth correction).
We make the same case in our broader cast iron skillet buying guide: for pizza specifically, you want a heavy pan that’s stubborn about temperature, not a light responsive pan. Stargazer and Field are excellent skillets, but their lighter mass works against you for pizza, where the pan needs to hold 500°F+ through a 15-minute bake.
If you cook pizza often, the second pan worth owning is a Lodge wedge pan or a Lodge 14-inch round, which gets you a true pizzeria-size pie that fits a pizza cutter the way the small pans don’t. Lodge sells both in the $40 to $60 range; the 10.25-inch Classic should still be your first cast iron purchase.
Troubleshooting
The bottom is soggy, not crispy. Either not enough oil in the pan (2 tablespoons is the floor) or too much sauce (3 to 4 tablespoons is the ceiling for a 10-inch pizza). Try again with both fixed.
The crust stuck to the pan. Not enough oil. Or your pan’s seasoning is patchy. Run the seasoning rescue from our seasoning pillar and try again. Once the pan has 3 to 4 properly polymerized seasoning layers, sticking effectively stops.
The crust is pale and floppy. Your oven is below 450°F at peak temperature (use an oven thermometer to check; home ovens are often 25 to 50°F off). Switch to Method 2 (stove-then-oven) to compensate.
The cheese is greasy, not melted. Pre-shredded bag cheese. Switch to a block of low-moisture mozzarella and hand-shred.
The toppings burned but the cheese is barely melted. You added everything raw and baked too long. Either par-cook the toppings (mushrooms, peppers, sausage), or add delicate items (basil, prosciutto, arugula) after baking, not before.
What to skip
- Pre-shredded bag mozzarella. Discussed above. Anti-caking starch ruins the melt.
- Parchment paper in the pan during the bake. Parchment is rated to 425°F; above that it scorches and crumbles. Use it as a transfer sling only (Method 2), then remove.
- Putting cold dough straight into a hot pan. The dough seizes and won’t stretch. Let it come to room temperature first.
- Trying to “season” the pan with the pizza oil during the bake. Pizza oil is olive oil, which has a smoke point below 400°F. Real seasoning uses a high-smoke-point oil and a separate process; don’t conflate cooking oil and seasoning oil.
- Cooking pizza in a Dutch oven instead of a skillet. The walls of a Dutch oven are too tall, the pizza steams instead of bakes, the crust never browns properly. The skillet’s shallow wall is what makes the bake work.
- Using a pizza stone underneath the cast iron pan. The stone steals heat from the bottom of the pan during the preheat and doesn’t help during the bake. The cast iron already has the conduction floor; the stone is redundant.
- Sugar in the dough. Some recipes call for it. It speeds the yeast but masks the flavor a long cold proof develops. Skip it.
FAQ
Can you cook pizza in a cast iron skillet?
Yes, and it might be the best home-oven pizza vessel that exists. Cast iron’s thermal mass, conduction, and emissivity give you a crispier bottom and faster bake than any aluminum pan or pizza stone. Use a 10 to 12-inch skillet with 2 tablespoons of oil at the highest temperature your oven supports.
What temperature do you cook cast iron pizza at?
Bake at the highest temperature your oven supports. 550°F for the Kenji-style bake-only method (12-15 minutes), 500°F as the comfortable floor (15-18 minutes), 450°F only if you use the stove-then-oven hybrid to push the pan past the oven’s ceiling.
What is the 3/8 rule for pizza?
Roughly 3/8 of an ounce of cheese per square inch of pizza surface. For a 10-inch cast iron pizza (78 square inches), that’s about 2 ounces of cheese, half a cup shredded. Guideline, not law; cast iron pan pizzas can carry slightly more cheese than thin-crust because the deep crust absorbs the fat.
How long do you cook a pizza in a cast iron skillet?
12 to 20 minutes for pan pizza, 25 to 35 minutes for deep-dish. The exact time depends on oven temperature, pan size, and topping load. Visual cues (cheese bubbling in the center, crust edge dark golden) are more reliable than the timer.
What are common cast iron pizza mistakes?
Not enough oil (use 2 tablespoons in a 10-inch pan), cold dough into a hot pan, too much sauce, pre-shredded bag cheese, and baking below 450°F. Fix any one of those and most home-cook pizza failures go away.
Do I need to preheat the cast iron pan before adding the dough?
Depends on the method. Method 1 (Kenji-style, 500°F+ oven): no, dough goes in cold and proofs in the pan. Method 2 (stove-then-oven, 450°F oven): yes, preheat the pan empty for 3 to 4 minutes on medium-high before adding oil and dough. Method 3 (broil-finish): same as Method 1 or 2, with the broil step added at the end.
What this gets you
The first cast iron pizza you make with one of these three methods will be better than 90% of frozen pizzas and most delivery. The third one will be better than most pizzerias outside actual pizza cities. The pan does most of the work; the dough’s cold proof does the flavor work; your job is to match the method to your oven and not over-sauce. Same Lodge skillet that handles eggs, steak, and cornbread handles pizza. One pan, the whole dinner menu.