Most recipes on how to cook a steak in a cast iron skillet give you a time-per-side number and call it a day. That works for a 1-inch ribeye on a medium-hot pan, fails for a 2-inch tomahawk, and ignores the actual variable that matters: internal temperature. This guide covers both real methods (direct sear for thin steaks, reverse sear for thick), the Maillard chemistry that justifies the steps, the pull temperatures for every doneness level, and how the method changes for ribeye versus sirloin versus skirt. No “4 minutes per side.”
TL;DR: pick your method by thickness
- Under 1.5 inches (most ribeyes, strips, sirloin): direct sear. Salt 40 min ahead, pat dry, preheat the pan to ~500°F, sear 2-3 min per side, baste with butter and garlic in the last 60 sec, pull 5°F below target internal temp, rest 8-10 min.
- 1.5 inches or thicker (thick ribeye, tomahawk, porterhouse, filet over 2 in): reverse sear. Salt 40 min ahead, oven at 250°F until internal hits 110°F (about 30-45 min), then sear 60-90 sec per side in screaming-hot cast iron, rest 5 min.
- The deciding factor is thickness, not cut. A 1-inch filet sears like a 1-inch ribeye. A 2-inch ribeye reverse-sears like a 2-inch tomahawk.
- Use a thermometer. Pull at 120°F for rare, 125°F for medium-rare, 135°F for medium. Carryover cooking adds 5°F during the rest.
- Oil for the sear (grapeseed or refined avocado), butter for the finish. Butter at 500°F is burned butter.
That’s the entire method. The rest of this article explains why each step matters, what to do for each cut, and what to skip.
The chemistry: why cast iron makes a better crust
Crust on a steak is the Maillard reaction: a chemical reaction between amino acids and reducing sugars on the meat’s surface at temperatures above roughly 280°F (137°C). The reaction produces hundreds of new flavor compounds and the brown, savory crust that defines a good steak. Below 280°F, you get steamed gray meat. Above 350°F, you get rapid browning. Above 500°F, you risk crossing into burning before the inside cooks.
Cast iron wins at this for two reasons. First, heat retention: a thick cast iron pan stores so much thermal energy that adding a cold steak barely drops the surface temperature, so the Maillard reaction continues uninterrupted. A thin stainless pan loses 100°F the moment the steak hits it, and the reaction stalls. Second, even heat across the surface: cast iron’s mass distributes heat across the cooking surface, so the entire steak browns at once rather than getting hot spots and cold spots. We cover the broader chemistry of why cast iron behaves this way in our seasoning guide; the short version is that the pan’s mass is doing the work.
This is why every “use a hot pan” rule for steak is really a rule for using cast iron specifically. A 500°F nonstick is melting Teflon. A 500°F stainless is fine but loses heat fast. A 500°F cast iron stays at 500°F.
Pick a steak thickness, pick a method
Before you start, measure the steak. Most people cook by cut name (ribeye, strip, filet) when they should cook by thickness. Here’s the rule:
- Under 1 inch: direct sear, short total cook (4-5 min). Will be challenging to hit anything below medium without overcooking.
- 1 to 1.5 inches: direct sear, the sweet spot. About 5-7 min total. This is what most “cook a steak” guides assume.
- 1.5 to 2 inches: reverse sear. The interior needs time to come up; the direct method burns the outside before the center cooks.
- 2 inches and thicker: reverse sear is non-negotiable. Direct method on a 2-inch steak produces a gray band around an undercooked center.
If you’re buying steak specifically to cook in cast iron, 1.25-1.5 inches is the optimal thickness. Thick enough for a real crust without overcooking, thin enough to direct-sear in one pass.
Direct sear (for steaks under 1.5 inches)
The standard method, the one every recipe on page 1 of Google teaches. The differences are in the specifics.
Step 1: salt, rest, pat dry
40 minutes before cooking, salt the steak generously with kosher salt on every surface (top, bottom, and edges). Use Diamond Crystal kosher salt at roughly 1 teaspoon per side for a typical 12-oz steak. The salt does two things: it draws moisture out, then it gets reabsorbed along with dissolved myosin, which essentially seasons the steak from the inside.
Let the steak sit on the counter for those 40 minutes. Room-temperature meat cooks more evenly than fridge-cold meat. The food-safety guidance is to keep meat under 2 hours at room temperature; 40 minutes is well within that limit, and the bacterial growth on a salted steak in that window is negligible.
Right before cooking, pat the steak completely dry with paper towels. Press, don’t drag. This is the single most-impactful step for crust formation that nobody talks about: a wet steak surface boils water before it browns, and the temperature stalls at 212°F (water’s boiling point), which is 80°F below the Maillard threshold. A dry surface goes straight to browning.
Step 2: preheat the pan to ~500°F
Put the cast iron on the burner over medium-high heat for 5-6 minutes. The pan is hot enough when a drop of water flicked on the surface dances and evaporates within 1-2 seconds (Leidenfrost effect). If it sizzles and sits, the pan isn’t hot enough yet; if it disappears instantly, you’re at temperature.
For oil, use grapeseed (smoke point 420°F) or refined avocado oil (520°F). See our best-oil writeup for why those oils and not others. Add 1-2 tablespoons to the hot pan, swirl to coat. The oil will smoke within seconds; that’s correct.
Step 3: sear, flip, sear
Lay the steak away from you to avoid splatter. Don’t move it for 2-3 minutes. Resist the urge to peek; lifting the steak breaks the contact between the surface and the pan, which interrupts the Maillard reaction.
After 2-3 minutes, flip with tongs (not a fork, which pierces the meat and releases juice). Sear the second side for 2-3 minutes. If you want, sear the edges for 30 seconds each by holding the steak vertically with tongs.
Check internal temperature with a thermometer. A Thermapen ONE ($109) or any of the Thermapen-clone $15 instant-reads does the job. Probe the thickest part of the steak. The doneness table below shows pull temperatures.
Step 4: baste with butter, garlic, herbs (last 60 seconds)
Pull the heat down to medium. Add 2 tablespoons of unsalted butter, 2-3 crushed garlic cloves, and a sprig of rosemary or thyme. The butter foams immediately. Tilt the pan to pool the butter, then spoon (baste) the foaming butter over the steak for 45-60 seconds.
Reverse this order at your peril. Butter added to a 500°F pan burns in seconds and turns bitter. Adding it after the sear is done means the butter only sees ~350°F, which browns it (good) without burning (bad).
Garlic and herbs do the same thing: at 500°F they char and turn acrid; at 350°F they perfume the butter. The basting step is short for a reason.
Step 5: rest 8-10 minutes
Move the steak to a cutting board or warm plate. Don’t slice it yet. Don’t tent it with foil (which steams the crust soft); leave it open to the air.
During the rest, two things happen. The internal temperature rises 5-8°F from carryover cooking (residual heat finishing the work), which is why you pull at 5°F below your target. And the muscle fibers relax, releasing the juices that pressure-cooked toward the center back into the rest of the steak. Cut a steak immediately and the juice pools on the cutting board; cut it after 8 minutes and the juice stays in the meat.
A 1-inch steak needs 5-8 minutes of rest. A 1.5-inch needs 8-10. Thick reverse-seared steaks (next section) only need 5 minutes since they were rested while still in the pan.
Reverse sear (for steaks 1.5 inches and thicker)
Reverse sear inverts the order: cook the interior to almost-done in a low oven first, then sear the outside in the hottest pan you can manage at the end. The result is even pink edge-to-edge with a perfect crust, no gray band.
The why: even doneness + crust at the end
Direct-sear on a thick steak forces a temperature gradient: the outside hits 500°F while the center is still cold. By the time the center reaches 130°F, the layer 1/4 inch below the surface is 165°F (well-done), and you get a gray band of overcooked meat around a pink center. Reverse-sear gets the interior to almost-doneness first in a gentle 250°F oven, so the whole steak is pink throughout, then the final sear adds only the crust without overcooking anything.
This is the method Serious Eats / Kenji López-Alt recommends for any steak thicker than 1.5 inches, and Cook’s Illustrated has tested it with the same result. It’s the consensus method that didn’t make it onto page 1 of the SERP for some reason.
Step 1: salt, rest, oven at 250°F
Same salt and rest as the direct-sear method, but timing is more forgiving since the long oven phase finishes any drawing-and-reabsorbing of moisture.
Preheat the oven to 250°F. Put a wire rack in a sheet pan and put the steak on the rack (elevating the steak so air circulates underneath, cooking it evenly). Insert an oven-safe leave-in thermometer into the thickest part of the steak.
Step 2: pull at internal 110°F
Cook in the oven until the internal temperature hits 110°F (or 115°F if you want medium instead of medium-rare). For a 1.5-inch steak, this takes about 30-40 minutes. For a 2-inch tomahawk, about 50-60 minutes. For a 3-inch porterhouse, up to 90 minutes.
The exact time depends on the steak’s starting temperature, the oven’s true temperature (most home ovens are off by 10-25°F from their setting), and the steak’s thickness. The thermometer is the only reliable signal.
When the steak hits 110°F, pull it out and put it on a plate while you prep the sear pan. Pat it dry again with paper towels; the oven phase generates some moisture on the surface.
Step 3: sear in screaming-hot cast iron (60-90 seconds per side)
Get the cast iron screaming hot, hotter than for direct-sear. Medium-high for 6-8 minutes; you want the pan smoking at the start of the sear. Add a tablespoon of refined avocado oil; let it shimmer and smoke.
Lay the steak in the pan. Sear for 60 seconds, then flip. Sear the other side for 60 seconds. Use tongs to sear the edges for 15-20 seconds each.
That’s it. The interior is already at the right temperature; you’re only building crust. Adding butter and herbs is optional; we usually skip them on reverse-sear because the dry-aged-style crust on its own is the point. If you want them, add in the last 30 seconds, same as the direct-sear method.
Step 4: rest 5 minutes
Reverse-seared steaks need less rest than direct-seared because they’re already largely at the right temperature throughout. 5 minutes is plenty. Slice and serve.
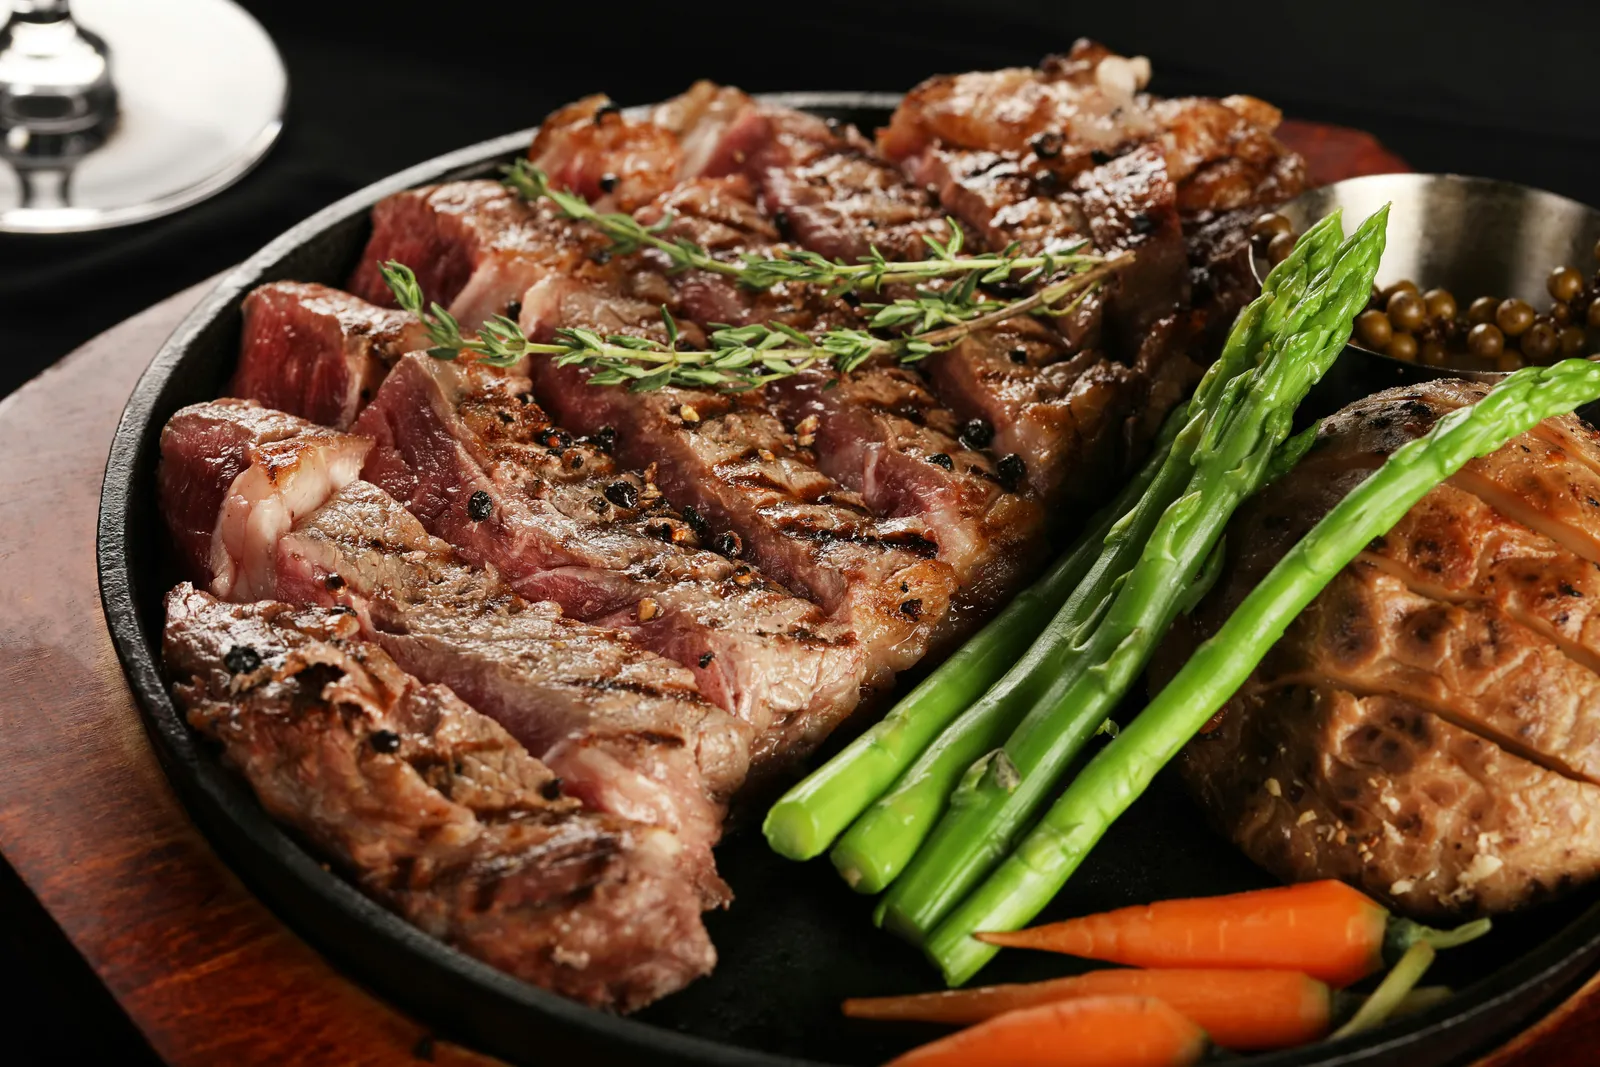
Internal temperatures: doneness by thermometer
This is the table that should replace every “minutes per side” instruction on the internet. Carryover cooking adds 5°F during the rest, so pull at 5°F below your target.
| Doneness | Pull at | Rest to | Internal color |
|---|---|---|---|
| Rare | 120°F | 125°F | Cool red center |
| Medium-rare | 125°F | 130°F | Warm red center |
| Medium | 135°F | 140°F | Warm pink center |
| Medium-well | 140°F | 145°F | Slightly pink center |
| Well-done | 150°F | 155°F | No pink |
The USDA recommends 145°F for whole-muscle beef cuts, which is well-done. The 130°F medium-rare consensus among chefs reflects taste, not safety; whole-muscle beef is essentially sterile internally, so the surface sear (which always reaches well above 145°F) is what handles food safety. Ground beef is a different conversation (the bacteria can be distributed throughout); for whole-muscle steak, 130°F is fine.
The four cuts and how the method changes
The method is mostly thickness-driven, but the cut matters for a few things: marbling, leanness, and grain direction.
Ribeye and strip (1-2 inches, direct or reverse depending on thickness)
The default steak. Both are well-marbled, both cook the same way. A 1-inch ribeye direct-sears in 6 minutes total. A 2-inch ribeye reverse-sears. Strip is leaner than ribeye and slightly less forgiving (overcooks faster), so pull strip 5°F earlier than ribeye for the same doneness if you’re guessing.
Filet mignon (thick + lean, reverse-sear preferred)
Filets are typically thick (2-3 inches) and very lean. The reverse-sear method is essential here because direct-searing a 2-inch lean cut produces a tough, gray exterior. Reverse-sear gets the interior to medium-rare while keeping the outside thin enough to crust without overcooking.
Filets benefit more than other cuts from a butter baste at the end; the cut is so lean that the basted butter adds fat and flavor the meat doesn’t have on its own.
Sirloin, flank, and skirt (thin, fast direct sear only)
Sirloin (often 1-inch), flank (~3/4 inch), and skirt (1/2 inch) are thin cuts that direct-sear in 2-4 minutes total. Reverse-sear doesn’t work on these because the oven phase would overcook them before the searing phase begins.
Flank and skirt are also grainy cuts: the muscle fibers run in long parallel lines. After cooking, slice against the grain (perpendicular to the muscle fibers) in thin slices. Slicing with the grain produces chewy strips even when the steak is perfectly cooked.
Tomahawk and porterhouse (thick + bone-in, always reverse-sear)
Tomahawks are typically 2+ inches with a long bone, porterhouses are similar with a T-shape. Both are too thick for direct-sear. Reverse-sear at 250°F, then sear in cast iron for 60-90 seconds per side. The bone slows heat transfer in the meat directly next to it, so the area next to the bone will be slightly less done than the rest. This is normal and considered desirable by most steak enthusiasts.
What to skip
Five recommendations that show up regularly and shouldn’t.
- The “3-3-3-3 rule.” A shorthand that gives you a starting point for a 1-inch steak at medium-rare, but ignores pan temperature, starting steak temperature, and target doneness. Use a thermometer.
- Olive oil as the sear oil. Smoke point 375°F (refined) or lower (extra virgin). You’ll smoke off the oil before the pan reaches sear temperature. Use grapeseed or refined avocado.
- Stainless steel pan instead of cast iron for thin steaks. Stainless drops 100°F when the steak hits it. The pan doesn’t recover for 30-60 seconds, by which point the crust has stalled. Cast iron’s mass is the entire point.
- Resting the steak under foil. The foil traps steam, which softens the crust you just spent 6 minutes building. Rest open to the air.
- “Searing in the juices.” A myth from the 1850s (Justus von Liebig). Searing doesn’t seal anything; juice loss is governed by temperature and rest, not by crust. The reason to sear is Maillard flavor.
Frequently asked questions
How to cook a perfect steak in a cast iron pan? For thin steaks: salt 40 min ahead, pat dry, preheat to 500°F, sear 2-3 min per side, baste with butter in the last 60 sec, pull 5°F below target temp, rest 8-10 min. For thick steaks: reverse-sear in a 250°F oven to 110°F internal, then 60-90 sec per side in a screaming-hot pan. Thickness picks the method.
What is the 3-3-3-3 rule for steaks? Online shorthand for 3 minutes on side 1, 3 on side 2, 3 more on side 1 at lower heat, 3 more on side 2. Works for a 1-inch steak at medium-rare, useless without a thermometer or a known starting temp.
Do you put butter or oil in a cast iron skillet for steak? Both, in sequence. High-smoke-point oil (grapeseed or refined avocado) for the sear because butter burns at 350°F. Add butter, garlic, and herbs in the last 60 seconds for basting and flavor.
Do you cook steak in cast iron oil or butter? Oil for the sear, butter for the finish. Reversed order = burned butter, no crust.
How long do you cook a steak in a cast iron skillet for medium rare? A 1-inch steak via direct-sear: 2.5-3 min per side at 500°F, pull at 125°F internal. A 1.5-inch steak via reverse-sear: 30-45 min in a 250°F oven (to 110°F), then 60-90 sec per side. Time-per-side without a thermometer is unreliable.
Should I finish steak in the oven after searing? Only if the steak is thicker than 1.5 inches and you didn’t reverse-sear it first. For thinner steaks, the direct sear is the entire cook.
How do I cook a steak in a cast iron skillet without smoke? You can’t, fully, at the temperatures that make a real crust. Open windows, run the range hood, run the bathroom fan. To minimize smoke, reverse-sear (most of the cook happens in a low oven) and use refined avocado oil (520°F smoke point).
Related reading
This is the technique pillar for the cast iron + steak intent. When you’re ready to take the method further:
- How to season a cast iron skillet, the seasoning is what makes the 500°F sear safe and non-stick. If your pan smoked unevenly or eggs stuck during the basting step, that’s a seasoning problem.
- Best oil for seasoning a cast iron skillet, covers the same oil-picking question from a different angle (seasoning bakes vs cooking sears) and includes the full smoke-point table.
- How to clean a cast iron skillet, the cleanup routine after a steak cook. A hot pan and a chainmail scrubber is 60 seconds.
- Cast iron skillet pizza, the other 500°F use of this pan, where the same thermal-mass + Maillard chemistry produces a bakery-style crust on home-oven pizza.
- Cast iron chicken thighs, the same thermal-mass searing principle applied to crispy-skin poultry, with the dark-meat temperature most recipes get wrong.
A steak cooked correctly in cast iron has a crust like a steakhouse and a pink interior edge-to-edge. The method isn’t complicated; what’s complicated is throwing out the “4 minutes per side” advice and replacing it with thickness-decides-the-method and pull-by-thermometer. Do both of those and the pan does the rest.