Cast iron chicken thighs should be the easiest great thing you cook all week, but most recipes make the same mistake, and it is a single number: 165°F. That is the temperature nearly every top recipe pulls thighs at, and it is the reason so many home cooks end up with chicken that is safe, technically juicy, and slightly rubbery. 165°F is the right target for a lean chicken breast. It is the wrong target for a thigh.
Chicken thighs are dark meat, and dark meat is a different cooking problem than white meat. This guide is built around that one insight, plus the slow-render method that gives you skin that actually shatters, and the reason cast iron is the right pan for both. Get the temperature and the render right and thighs become the easiest great thing you can cook in a skillet.
Who this is for
Anyone who has cooked chicken thighs in a skillet and gotten flabby skin, rubbery meat, or both. Also for cooks who want to understand why thighs work the way they do, not just follow a recipe card. The method here applies to bone-in and boneless, stovetop and oven, and it is the same technique-first approach we use for cast iron steak: understand the heat, and the food takes care of itself.
TL;DR: the method in five steps
- Dry the skin. Pat thighs completely dry, or salt them and rest uncovered in the fridge for a few hours (a dry brine). Dry skin is crisp skin.
- Preheat the cast iron over medium heat until a drop of water dances and evaporates.
- Render skin-side-down, undisturbed, 8 to 12 minutes, until the skin is deep golden and releases from the pan on its own.
- Flip and finish: stovetop for thin or boneless thighs, or move the skillet into a 425°F oven for thick bone-in thighs.
- Pull at 180 to 185°F internal (not 165), rest 5 minutes, and spoon the rendered fat over the top.
The single most important change from every other recipe is in steps 3 and 5: render slowly, and cook the thighs hotter than you think.
The one number everyone gets wrong: thigh temperature
Here is the science the recipe blogs skip. Chicken breast is lean muscle, so it is best at 150 to 165°F, where it is just cooked and still moist; push it higher and it dries out. Thighs are the opposite. Dark meat is worked muscle, packed with connective tissue (collagen) and intramuscular fat. At 165°F that collagen has barely started to break down, which is why a thigh cooked to 165 can be juicy and still chewy at the same time, a texture people describe as rubbery.
Take the same thigh to 175 to 185°F and the collagen melts into gelatin while the fat renders, and the meat turns silky, tender, and even juicier, because gelatin holds water better than raw collagen does. Serious Eats makes the point directly in their breakdown of why thighs turn out tough: for dark meat, “overcooking” is the goal, and you should aim for 185 to 195°F, not just 165°F, because the connective tissue needs that heat to become gelatin.
To be clear about safety: 165°F is the USDA safe minimum, and chicken is safe at 165 and at every temperature above it. We are not telling you to undercook; we are telling you that for thighs specifically, the safe minimum is also the texture minimum, and you should blow past it. For a seared skillet thigh, 180 to 185°F is the practical sweet spot: tender and succulent without going fully fall-apart. If you want braised, fall-off-the-bone thighs, 185 to 195°F is the target.
Use an instant-read thermometer in the thickest part, away from the bone. This is the one cut where the thermometer matters most, because the difference between disappointing and excellent is about 15 degrees that you cannot see or feel by poking.
Why cast iron is the right pan (thermal mass)
Crispy skin needs sustained, even contact heat to render the fat and brown the surface. That is exactly what cast iron is built for. A preheated cast iron skillet holds a large reservoir of heat, so when the cold, wet thigh hits the surface, the pan temperature barely drops and the skin starts rendering immediately. A thin stainless or nonstick pan loses its heat to the cold meat and has to climb back up, which is when skin goes flabby and grey instead of golden.
This is the same thermal-mass advantage that makes cast iron the searing pan for steak, and it is why a heavy iron skillet renders chicken skin more evenly than almost anything else in a home kitchen. The pan also goes straight from the stovetop into the oven, which is the whole trick for thick bone-in thighs (more on that below). If you are weighing pans in general, our cast iron vs stainless steel comparison covers exactly why the heavier pan wins for searing and skin.
Bone-in or boneless, skin-on or skinless
The cut you buy decides what you can get out of it.
- Bone-in, skin-on: the best choice for a seared skillet thigh. The skin crisps, the bone adds flavor and protects the meat from overcooking, and the higher fat content makes them forgiving. This is what to buy if crispy skin is the goal.
- Boneless, skin-on: harder to find, but excellent; they cook faster than bone-in and still give you crispy skin. Great when you want speed without giving up the skin.
- Boneless, skinless: convenient and fast, ideal for stir-fries, curries, and chopped applications where the skin does not matter. But you give up the crispy-skin payoff entirely, and without the skin and bone they overcook more easily, so watch the thermometer.
For the method in this guide, bone-in skin-on is the default. Everything still applies to the others; you just adjust the timing and skip the skin-render step for skinless.
How to get shatter-crisp skin (the slow render)
Crispy skin is not complicated, but it rewards patience and punishes rushing. The mechanism: chicken skin is mostly fat and water held in a layer of collagen. To crisp it, you have to drive off the water, render out the fat, and brown what is left. That takes time at a steady medium heat, not a quick blast.
The steps that matter:
- Dry the skin. Water is the enemy of crisp. Pat the thighs completely dry with paper towels. For the best results, dry-brine: salt the thighs all over, set them skin-side-up on a rack, and leave them uncovered in the fridge for a few hours or overnight. The salt seasons the meat and the open air dries the skin into a tackier surface that crisps beautifully.
- Start skin-side-down in a preheated pan over medium. Not high. High heat browns the skin before the fat underneath has rendered, giving you skin that looks done but is chewy and greasy.
- Leave it alone. Do not move, poke, or peek-lift the thighs for the first 8 minutes. The skin releases from the pan on its own when it is properly rendered and crisp; if it sticks when you try to lift it, it is not ready. Forcing it tears the skin off.
- Render 8 to 12 minutes until the skin is deep golden brown and the thigh lifts cleanly. Then flip.
You will see a pool of rendered fat in the pan when the skin is right. That fat is schmaltz, and it is a feature, not a problem (see the pan sauce section).
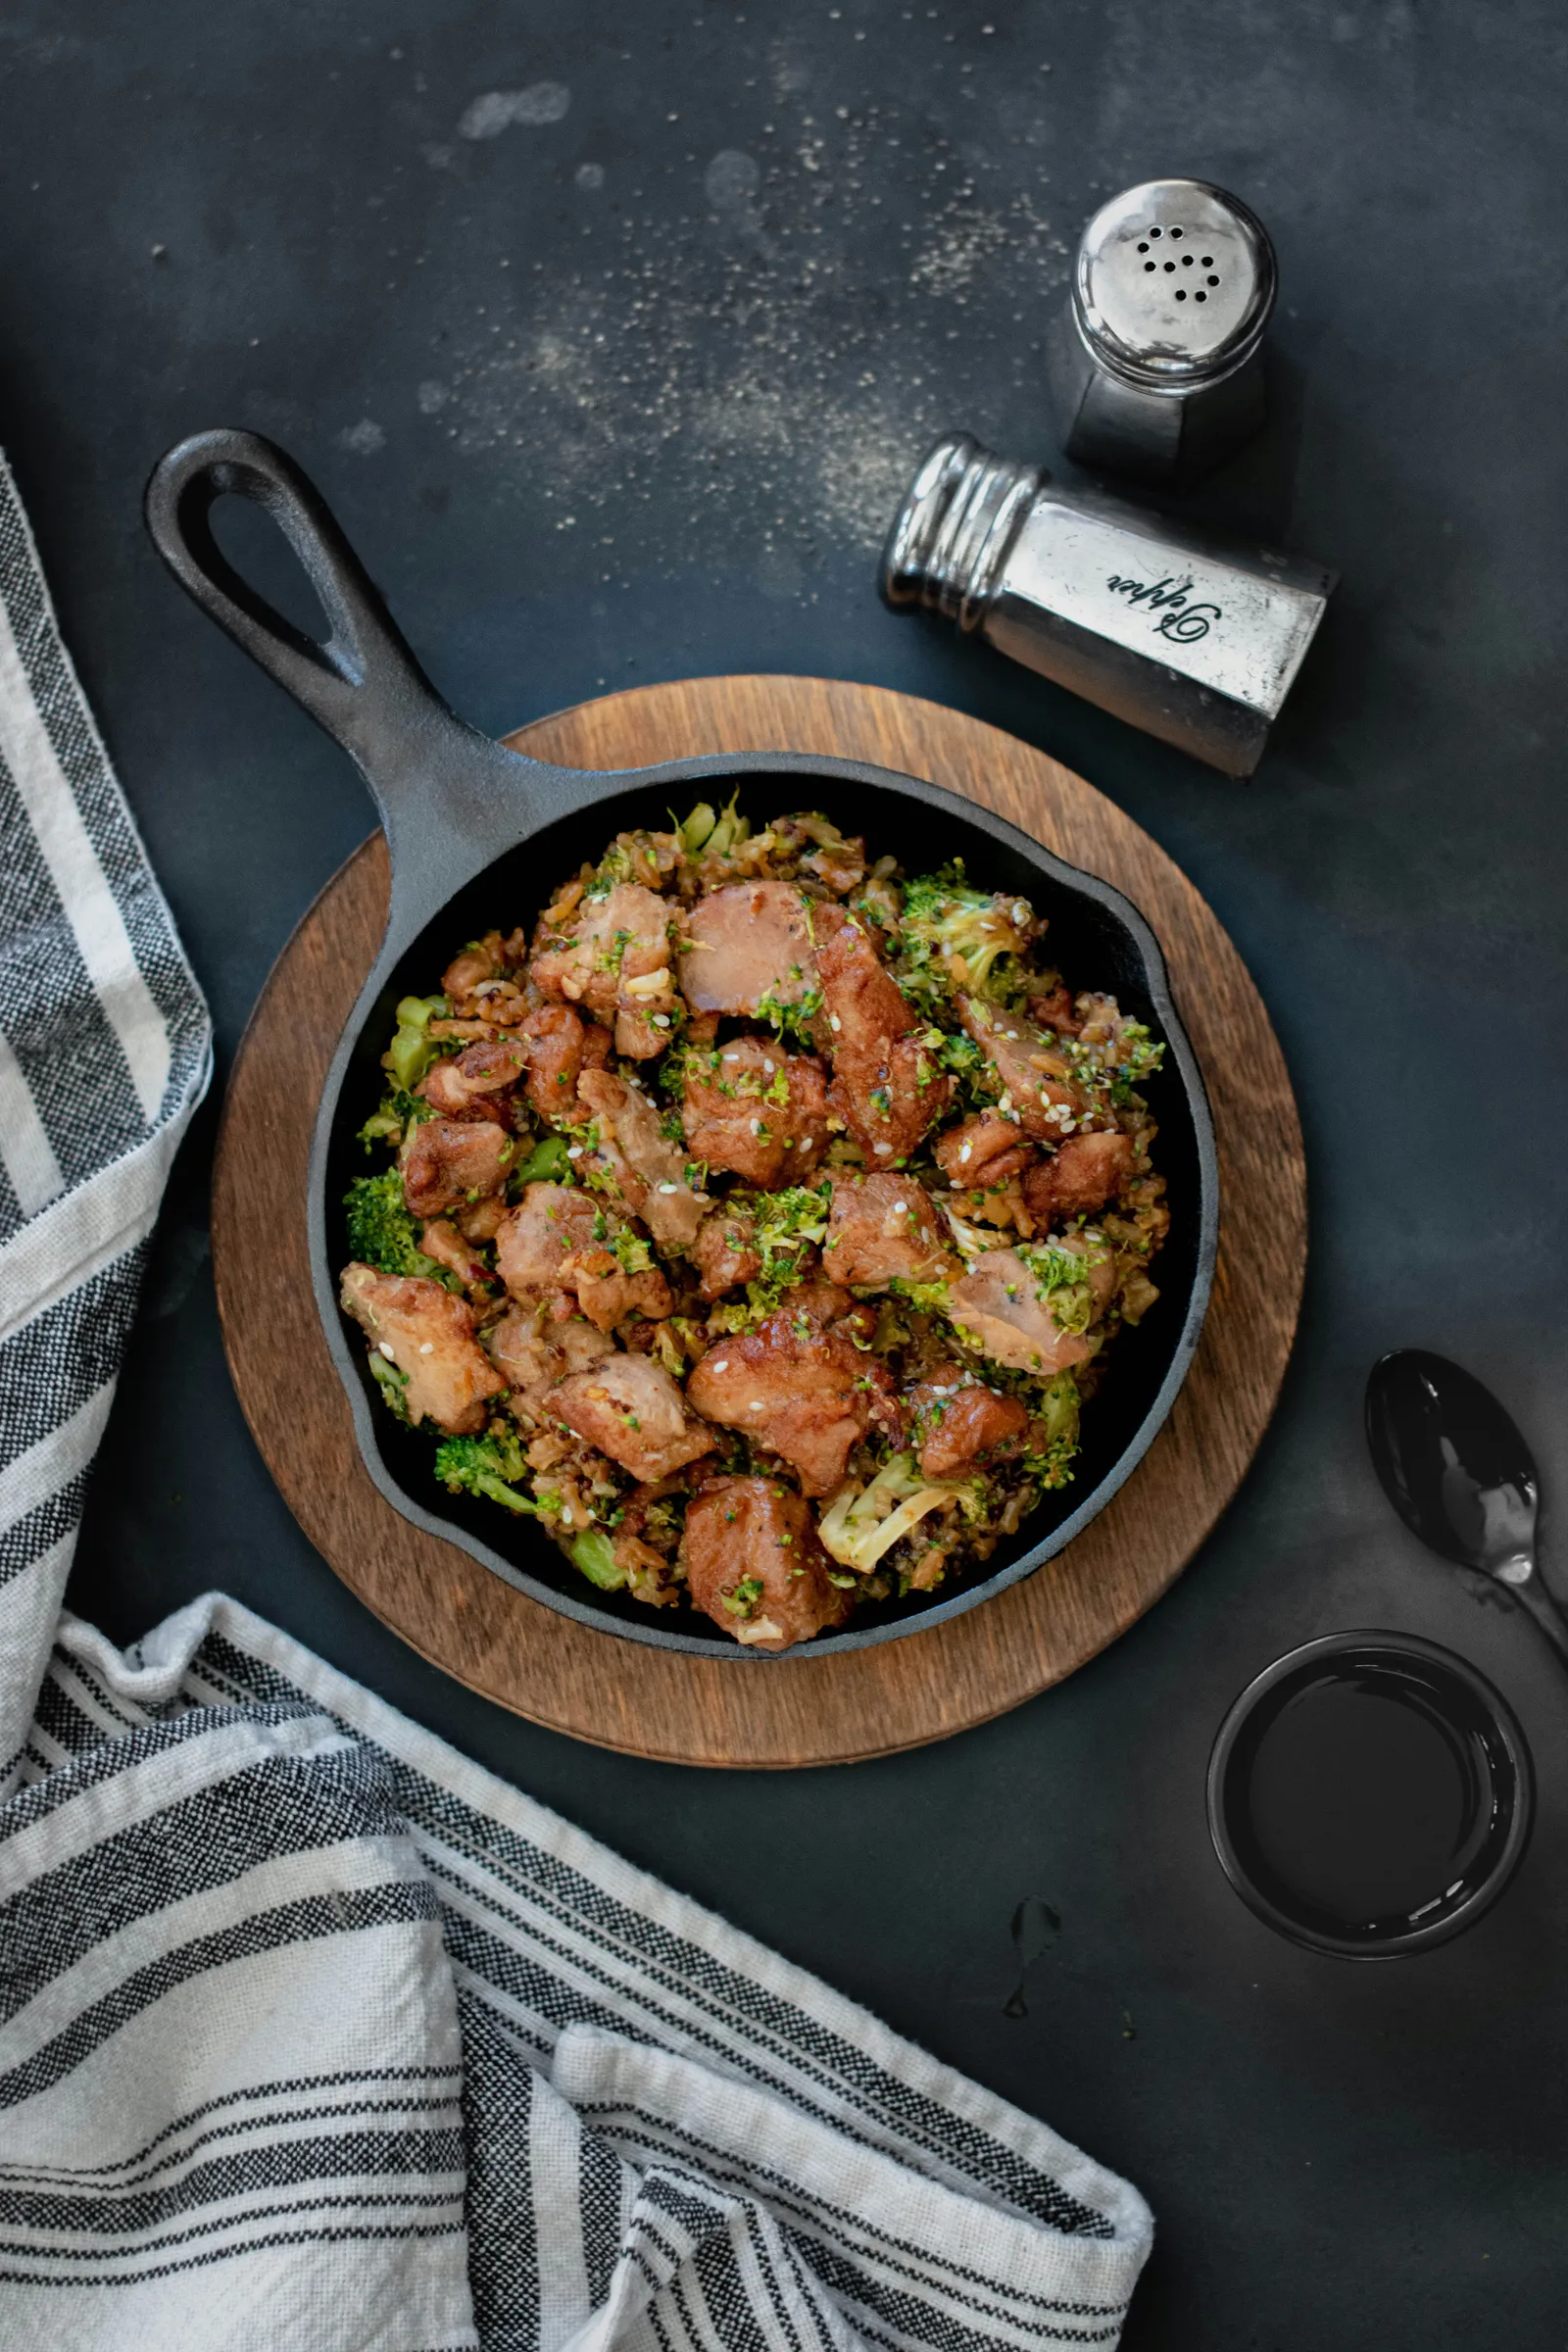
How to cook cast iron chicken thighs, step by step
This is the full method for bone-in, skin-on thighs, the most common and most rewarding version.
Step 1: dry the skin (or dry-brine ahead)
Pat the thighs bone-dry. If you have time, salt them (about 3/4 teaspoon kosher salt per pound) and rest them uncovered on a rack in the fridge for 4 to 24 hours. If you do not have time, dry them well and season just before cooking. Bring them closer to room temperature for 15 to 20 minutes before they hit the pan so they cook more evenly.
Step 2: preheat the pan and render skin-side-down
Set your cast iron skillet over medium heat for 3 to 4 minutes until it is evenly hot. Add a thin film of a high-smoke-point oil (the kind we cover in our cooking-oil guide), though with skin-on thighs you barely need it since they render their own fat. Lay the thighs skin-side-down, arranged so they are not touching. Let them render undisturbed for 8 to 12 minutes until the skin is deep golden and releases on its own.
Step 3: flip and finish (stovetop or oven)
Flip the thighs skin-side-up. For thin or boneless thighs, continue on the stovetop over medium for another 4 to 8 minutes. For thick bone-in thighs, transfer the whole skillet to a preheated 425°F oven and roast for 12 to 18 minutes. Either way, cook until the thickest part reaches 180 to 185°F on an instant-read thermometer.
Step 4: rest, and use the schmaltz
Move the thighs to a plate and rest 5 minutes so the juices redistribute. Meanwhile, you have a skillet full of rendered chicken fat and browned fond, which is the start of a pan sauce or just a spoonful of liquid gold to drizzle over the meat, rice, or vegetables.
Stovetop vs sear-then-oven (by thickness)
The fork in the method is thickness, not preference.
- Thin thighs (boneless, or small bone-in): stovetop start to finish. They cook through in the time it takes to render the skin and brown the second side, so the oven is unnecessary.
- Thick bone-in thighs: sear-then-oven. If you try to cook a big bone-in thigh through entirely on the stovetop, the skin scorches before the interior reaches 180°F. Searing skin-side-down to crisp the skin, then finishing in a 425°F oven, gets you crisp skin and properly cooked dark meat at the same time. This stovetop-to-oven handoff is exactly what cast iron is made for; no transferring to a baking dish, the same hot pan does both jobs.
The pan sauce you already made
When the thighs come out, do not pour off that fat and fond without thinking. You have the base for a fast pan sauce. Pour off all but a tablespoon of the rendered fat, add a minced shallot or garlic and cook 30 seconds, deglaze with a splash of white wine or chicken stock while scraping up the browned bits, simmer to reduce by half, and swirl in a knob of cold butter off the heat. Ninety seconds of work and the thighs go from good to restaurant-plate. If you would rather keep it simple, the plain schmaltz spooned over the meat is its own reward. Either way, the cleanup is easy; rendered chicken fat wipes out of a seasoned pan with the 60-second cast iron cleaning routine.
What to skip (the mistakes that make thighs rubbery)
- Pulling them at 165°F. The single biggest mistake. Thighs want 180 to 185°F. Cook to temperature, not to a timer or to “the juices run clear.”
- Moving the skin before it releases. If the thigh sticks when you try to lift it, the skin is not rendered yet. Forcing it tears the crisp layer off into the pan. Wait for the clean release.
- Crowding the pan. Thighs packed shoulder to shoulder steam in their own moisture instead of searing. Leave space between them; cook in two batches if you have to.
- Skipping the pat-dry. Wet skin will not crisp, full stop. Dry it, or dry-brine it.
- Using boneless-skinless when you want crispy skin. No skin, no crispy skin. Buy skin-on for a seared thigh.
- Cranking the heat to high. High heat browns the skin before the fat renders, giving you chewy, greasy skin. Medium and patient wins.
- Flipping repeatedly. Thighs need sustained contact on the skin side to render. One flip, not five.
Frequently asked questions
How do you cook chicken thighs in a cast iron skillet?
Pat the thighs bone-dry, season, and lay them skin-side-down in a preheated cast iron skillet over medium heat. Render the skin undisturbed for 8 to 12 minutes until it is deep golden and releases on its own, then flip. Finish on the stovetop for thin or boneless thighs, or in a 425°F oven for thick bone-in thighs, and pull them at 180 to 185°F internal. Rest 5 minutes before serving.
What temperature should chicken thighs be cooked to?
165°F is the USDA safe minimum and is safe at any higher temperature, but it is the right target for lean breast, not thighs. Thighs are dark meat full of connective tissue and fat, and they taste far better at 175 to 185°F, where the collagen melts into gelatin and the meat turns tender instead of rubbery. Serious Eats recommends up to 185 to 195°F for fall-apart dark meat. Use an instant-read thermometer, not a timer.
How long do chicken thighs take in a cast iron skillet?
Boneless thighs take about 12 to 16 minutes total: 8 to 12 skin-side-down, then 4 to 6 on the second side. Bone-in thighs take roughly 25 to 35 minutes, which is why thick bone-in thighs are best seared on the stove and finished in a 425°F oven. Cook to temperature (180 to 185°F), not the clock, since thigh size varies.
Can you cook chicken thighs in a cast iron skillet in the oven?
Yes, and it is the best method for thick bone-in thighs. Sear them skin-side-down on the stovetop to crisp the skin, then move the whole skillet into a 425°F oven to finish to 180 to 185°F without scorching the skin. Cast iron goes from stovetop to oven seamlessly, which is a major advantage for this job.
Should you use bone-in or boneless chicken thighs in cast iron?
Bone-in, skin-on is the better choice for flavor and crispy skin, which is the point of cooking thighs in cast iron. Boneless, skinless thighs cook faster and suit stir-fries or dishes where skin does not matter, but they give up the crispy-skin payoff and overcook more easily. For a seared skillet thigh, buy bone-in and skin-on.
How do you get crispy skin on cast iron chicken thighs?
A dry surface, a slow render, and patience. Pat the skin completely dry (or dry-brine, salting and resting uncovered in the fridge), lay the thighs skin-side-down in a preheated pan over medium heat, and render undisturbed for 8 to 12 minutes. Do not move them until the skin is deep golden and releases on its own; if it sticks, it is not ready. Cast iron’s heat retention keeps the surface hot for a steady, even render.
What are common mistakes when cooking chicken thighs?
Pulling them at 165°F (rubbery instead of tender), moving the skin before it has rendered and released, crowding the pan so the thighs steam, skipping the pat-dry so the skin never crisps, using boneless-skinless when you want crispy skin, and flipping repeatedly. Cook to 180 to 185°F, dry the skin, give the pan room, and be patient.
Related reading
Chicken thighs are a searing problem, so the technique overlaps with the rest of the cluster. The cast iron steak guide covers the same thermal-mass searing principle in more depth, and eggs in a cast iron skillet is the other side of skillet heat control. The pan’s nonstick release that lets the skin let go cleanly comes from good seasoning, and the rendered fat cleans up with the 60-second cleaning routine. If you are still choosing a pan, the best cast iron skillet guide covers what to buy (the Lodge Classic 10.25-inch skillet at around $30 is the no-nonsense default), and cast iron vs stainless steel explains why the heavy pan wins for skin and sear.
Cast iron chicken thighs come down to two corrections almost every recipe gets wrong: render the skin slowly instead of rushing it, and cook the meat to 180 to 185°F instead of stopping at 165. Do those two things in a hot, heavy skillet and you get shatter-crisp skin over meat that is genuinely tender, which is the whole reason to cook a thigh in the first place.